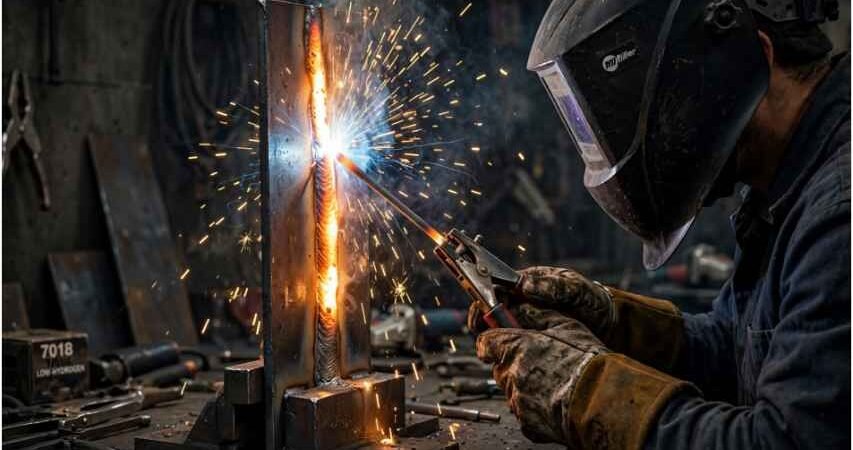
Vertical uphill welding forces you to fight gravity with a fluid pool of molten steel. When I first attempted out-of-position plate tests under American Welding Society D1.1 structural standards, my puddle regularly dumped onto the shop floor. Learning how to stick weld vertical up 7018 electrodes requires strict thermal control, mechanical muscle memory, and a rock-solid foundation shelf.
E7018 is an iron-powder, low-hydrogen electrode designed to freeze rapidly. Even with fast-freezing slag, improper heat inputs or incorrect wrist angles will ruin your profile. Dialing in your machine and dialing back your travel speed fixes these failures instantly.
Setting Up Your Rig: 7018 Amperage and Arc Force Parameters
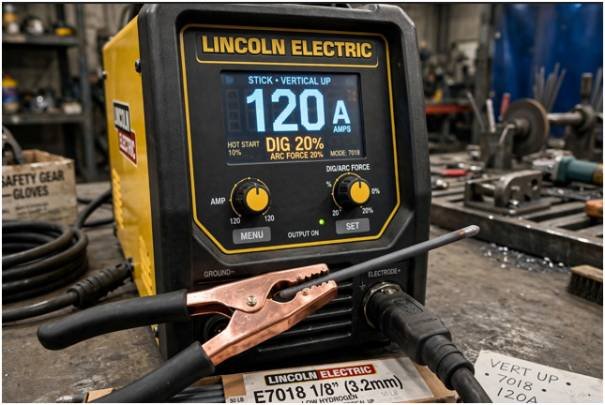
Vertical uphill runs require roughly 10% to 15% less heat than flat or horizontal positions. Excessive amperage overheats your base plate, keeping the weld pool molten too long for gravity to hold it.
Standard electrode data sheets from manufacturers like Lincoln Electric list wide parameter bands, but vertical runs demand a tight tolerance.
| Electrode Diameter | Plate Thickness Range | Flat/Horizontal Amps | Vertical Up (3G/3F) Amps | Target Starting Heat |
| 3/32″ (2.4 mm) | 1/8″ – 3/16″ | 90 – 110 A | 80 – 95 A | 85 A |
| 1/8″ (3.2 mm) | 1/4″ – 1/2″+ | 130 – 155 A | 115 – 125 A | 120 A |
| 5/32″ (4.0 mm) | 3/8″ – 1″+ | 170 – 200 A | 145 – 160 A | 150 A |
Dialing In Dig Control for Out-of-Position Stability
Arc force—commonly called “dig”—alters the machine’s volt-amp curve when the arc length shortens. On modern digital power sources documented by Miller Welds, set your dig between 15% and 25%.
Setting arc force to zero causes the rod to snuffed out in the puddle. Setting it above 40% makes the arc violently blow molten metal out of the joint. Around 20% dig creates enough drive to prevent sticking while keeping the puddle calm and controllable.
Rod Angles and Arc Length Mechanics in 3F and 3G Joints
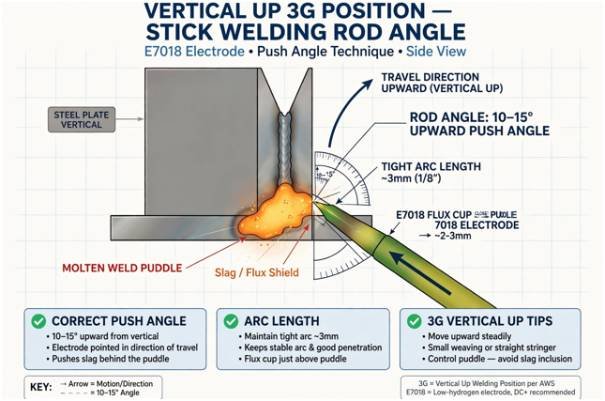
Arc length dictates voltage. Holding a long arc spikes your voltage, creates massive spatter, and widens your puddle until it sags.
Maintain a tight arc throughout the pass. You should hear a steady, aggressive sizzle rather than a harsh roar. Keep the flux coating nearly rubbing against the steel plate. As the core wire burns back into the flux cup, continually push your hands into the joint to maintain consistent distance.
Plate Surface
|
| / <– 10° to 15° Upward Push Angle
| /
| /
|/ (Tight Arc: Keep flux cup tight to the puddle)
|
Hold a 10-degree to 15-degree push angle pointing upward. A common shop trick is aiming for a dead-flat 90-degree angle to the workpiece. As your arms track up the coupon, your hands naturally drop, settling the rod directly into that optimal 10-degree upward push. If you lean the electrode up beyond 20 degrees, arc force will gouge the root and produce excessive spatter.
The Uphill Travel Technique: Stringers vs. Weaves
Vertical weld strength comes from building a supporting metal shelf. Striking your arc at the bottom of the joint begins this shelf. Establish the weld pool, allow it to freeze into a small ledge, and stack every subsequent oscillation directly on top.
| Pass Type | Joint Application | Ideal Motion Pattern | Bead Width Limit |
| Root Pass | V-Groove / Open Root / Tight Fillet | Straight stringer; slight feathering forward | 1.5x rod core diameter |
| Hot / Fill Pass | Deep groove fill | Inverted “V” or tight stepping box | 2.5x rod core diameter |
| Cap Pass | Final cosmetic / Structural cover | Straight horizontal weave (Z-pattern) | Maximum 2.5x to 3x rod core diameter |
Stringers are mandatory on structural fracture-critical jobs because heavy weaving dumps excessive heat into the steel. When laying a stringer, keep your travel speed uniform. Watch the sides of the pool wash into the parent plate, then step upward in small, steady increments.
The 0.6-Second Edge Cadence
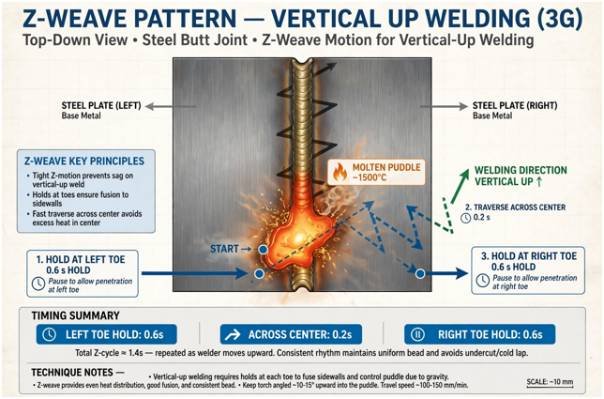
If your code specification allows a weave wash, run a tight Z-weave using a distinct timing cadence:
- Hold the left toe for 0.6 seconds until the puddle fills the corner flush.
- Step quickly across the center in 0.2 seconds.
- Hold the right toe for 0.6 seconds to wash out the notch.
Cruising quickly through the center prevents a high, crown-shaped bead. Lingering at the toes lets molten metal wash into the sidewalls, eliminating undercut entirely. Always grind mill scale to bare silver metal before laying beads; impurities create slag inclusions that ruin your tie-ins. Ensure your booth meets OSHA ventilation standards when burning low-hydrogen rods inside enclosed spaces.
Troubleshooting Common Vertical Uphill 7018 Defects
Defects during out-of-position runs typically point to simple posture and setup errors.
| Defect Observed | Primary Root Cause | Corrective Shop Action |
| Gouged Edges (Undercut) | Moving through the edges too fast; excessive amperage | Pause 0.6s at the toes; drop amperage by 5–10 A |
| Sagging / “Grapes” Under Bead | Arc length too long; travel speed too slow | Jam the rod in close; maintain a faster upward step |
| Internal Slag Pockets | Slag running ahead of the weld pool | Steep upward rod angle; establish a clean, continuous shelf |
| Pinholes / Wormholes | Moisture in rods; long-arcing the strike point | Use fresh rods from a 250°F oven; strike ahead and drag back |
Stop Fighting Gravity: The Final Bead
Gravity is predictable; work with it rather than against it. Lower your heat by 10%, shove that 7018 rod deep into the joint, and count your pauses on the edges. Once you learn to read the liquid steel instead of the glowing slag, your vertical caps will look like stacked rows of coins. Grab some scrap plate, bevel the edges, set your machine to 120 amps, and lay a clean run.
Frequently Asked Questions
1. Why does my vertical 7018 puddle constantly drip downward?
Your amperage is set too high or your arc length is too long, causing excessive heat buildup in the puddle.
2. Can I weld downhill with an E7018 stick electrode?
No, 7018 is not designed for vertical down; the fluid slag will outrun the puddle, trapping inclusions underneath the bead.
3. What causes severe undercut along the toes of a vertical weave?
Failing to pause at the outer edges of the joint or running the machine too hot causes severe undercut.
4. Should I weave or run stringers on 3G weld tests?
Run stringer beads unless the welding procedure specification (WPS) specifically permits weaves, as stringers maximize impact toughness.