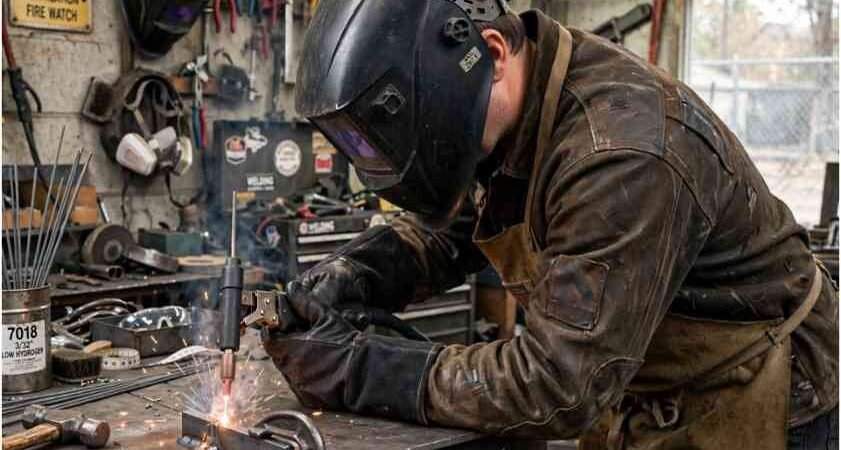
I burned through a whole box of 7018 before I realized my travel angle was the problem, not my amps. My beads looked fine for the first inch, then crowned up, trapped slag, and lost penetration. If that sounds familiar, your hand position is drifting as the rod shortens.
Learning how to keep consistent travel angle stick welding changed everything for me. It is not about holding still. It is about moving two ways at once.
Why Your Travel Angle Falls Apart Mid-Rod
The distance between your stinger and the puddle constantly shrinks. If you keep your elbow locked, physics flattens your rod. You start at 15 degrees and end at 35 without noticing.
Most beginners watch the bright arc. I did too. Pros watch the puddle and the slag right behind it. That shrinking rod forces you to actively adjust. This is the same muscle memory challenge I had to unlearn when learning the whip and pause stick welding technique, where timing beats brute force.
What The Correct Travel Angle Actually Is
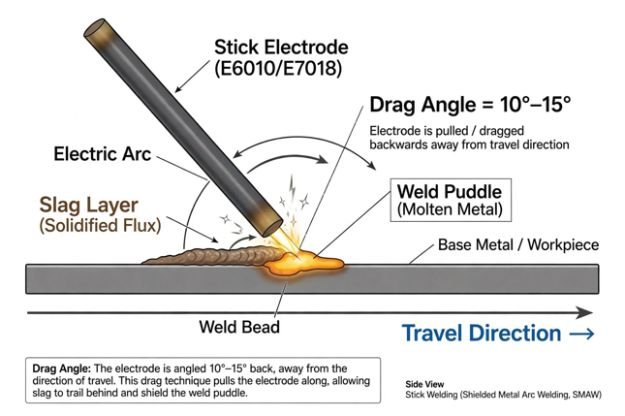
For flat, horizontal, and overhead, you want a 10 to 15-degree drag angle. Drag means the top of the rod leans back, opposite your travel direction.
This is different from work angle. Miller Electric defines travel angle as the angle along the joint line, while work angle is side-to-side. Understanding both is critical, and you can see it clearly explained in Miller’s Five Steps to Improving Stick Technique.
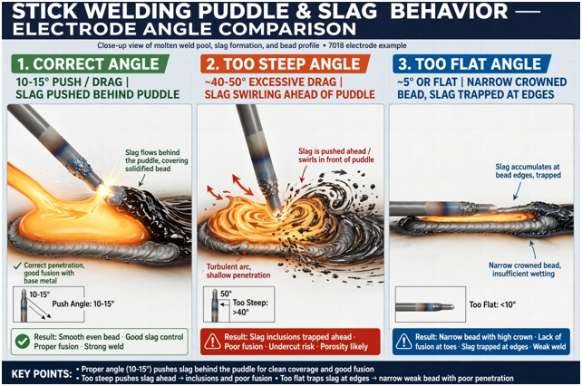
Why 10-15 degrees? That slight drag lets arc force push molten slag behind the puddle. Go too vertical and slag swirls ahead. Go too flat and you lose penetration. Lincoln Electric has a great breakdown of how travel angle affects penetration in their travel vs work angle guide.
My Two-Motion Method That Finally Fixed My Angle
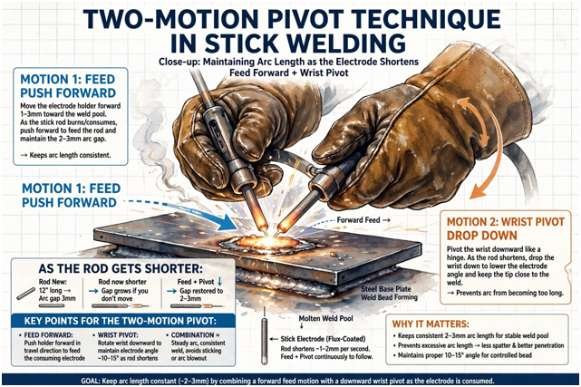
I call this the Two-Motion Pivot. Once I started doing it intentionally, my slag peeled on its own.
Motion 1: The Feed
Push your dominant hand steadily toward the plate. You are feeding the rod as it melts. Keep a tight arc, about one rod diameter off the plate. No long arc.
Motion 2: The Wrist Pivot
As you feed, let your wrist drop slightly. Think of it as a slow hinge. The rod gets shorter, so your wrist must lower to hold that 10-15 degree lean. If your wrist stays rigid, the angle dies.
I practiced this without striking an arc for 20 minutes. It feels weird at first, but it becomes automatic.
Body Mechanics That Lock Your Angle In Place
You cannot hold angle with a floating arm.
Brace, Don’t Float
Never weld freehand if you can avoid it. I brace my non-dominant forearm on the table, then lightly hold my stinger wrist with that hand. Two points of contact kill shake. Heavy gloves let you brace right on the workpiece when needed. Unimig covers this prop method well in their Ultimate Guide to Stick Welding.
The Dry Run I Never Skip
Before I strike an arc, I drag the cold rod across the whole joint. Start to finish. If my elbow hits my ribs or my shoulder locks halfway, I reposition my feet. That dry run prevents a forced angle change mid-weld.
This bracing concept translates to other processes too. Whether you are doing stick or debating mig welding cursive e vs crescent pattern, a stable platform controls consistency more than hand speed.
How To Read The Slag And Correct On The Fly
Stop staring at the arc. Watch right behind it.
If your angle is right, slag freezes cleanly about a quarter inch behind the puddle and peels as a solid sheet. If you see slag washing around the sides of the rod or bubbling ahead of you, you are too vertical. Tip back 5 degrees. If your bead goes narrow, ropey and tall, you are too flat. Stand the rod up slightly.
I learned this the hard way on a horizontal 2G test. My angle flattened to almost 30 degrees and I trapped a full line of slag. The bend test snapped.
Travel Angle Adjustments By Welding Position
Your base angle changes slightly with gravity.
| Position | Travel Angle | Technique Note |
| Flat / Horizontal (1F, 2F, 1G, 2G) | 10° to 15° Drag | Lean top of rod back, away from travel direction |
| Vertical Uphill (3G Up) | 0° to 15° Push | Point rod slightly upward to let gravity hold puddle |
| Overhead (4G) | 10° to 15° Drag | Keep strict drag, tighter arc to fight drips |
Vertical uphill is the exception. A slight push angle helps you stack the puddle instead of letting it sag.
| Reference | Key Takeaway |
| MillerWelds Technique Guide | Defines 10-15° drag as ideal for most stick positions |
| Unimig Welding Guide | Emphasizes bracing and continuous feed for angle control |
| Lincoln Electric Resource | Clarifies travel vs work angle and penetration effects |
FAQs
1. What happens if stick welding travel angle is too steep?
Slag runs ahead of the puddle and gets trapped, causing inclusions and weak welds.
2. Is travel angle same as drag angle?
Drag is a type of travel angle where the rod leans back in the direction of travel.
3. How do you keep travel angle consistent as rod burns short?
Use the two-motion pivot: feed forward while dropping your wrist to maintain 10-15° lean.
4. Does travel angle affect penetration in stick welding?
Yes, too flat gives low penetration and a crowned bead, too steep causes slag entrapment.
Stop Chasing The Rod, Start Controlling It
Consistent angle is not talent. It is a trained pivot. For your next practice plate, run three beads focusing only on that feed-and-drop motion. Brace hard, do the dry run, and watch the slag line. Once you feel it, you will not lose it.