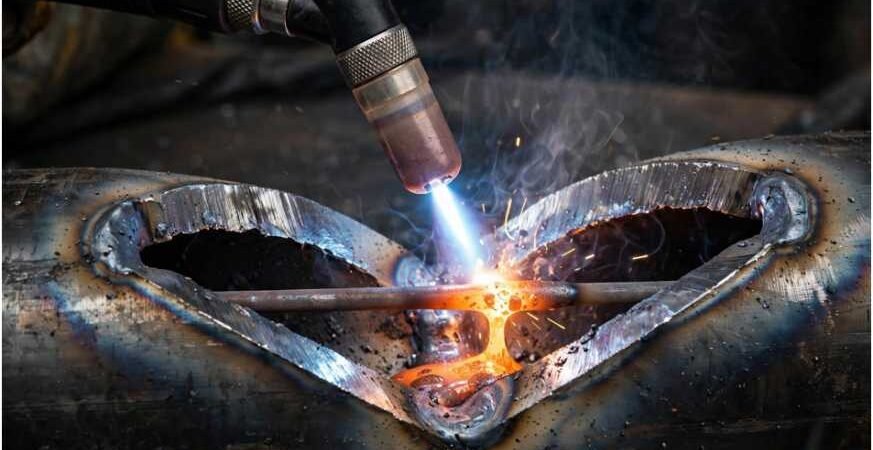
I learned how to weld open root pass with TIG lay wire technique on a 6-inch schedule 80 test coupon that kept failing me. I was dipping, dabbing, losing the backside. My instructor took my filler, laid it flat in the gap, told me to turn the heat up and push. One pass later I had full penetration. That moment changed how I weld pipe roots.
This method works because you lay the rod directly in the root opening and let arc force melt it through. You don’t feed with your fingers. It’s fast, clean, and it eliminates inconsistent dab timing.
Why I Switched To Lay Wire For Open Roots
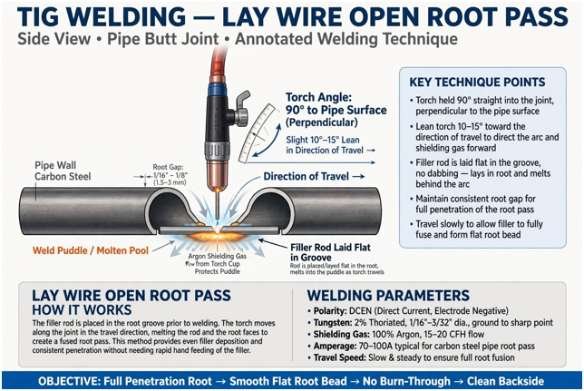
Pipe welders love lay wire for speed. On a 6G test you can cut your root time in half. The wire acts as a bridge. When your heat is right, the puddle washes through instead of sitting on top.
I use it on carbon and stainless pipe where the joint is consistent. It demands more amps than freehand dipping. The wire soaks heat, so you must run hot enough to break down both bevel faces instantly. Resources like Welding Tips and Tricks on 6G TIG roots and YesWelder’s breakdown of TIG root techniques confirm the same: tight fit-up plus high amperage equals success.
The Fit-Up That Makes Or Breaks Your Root
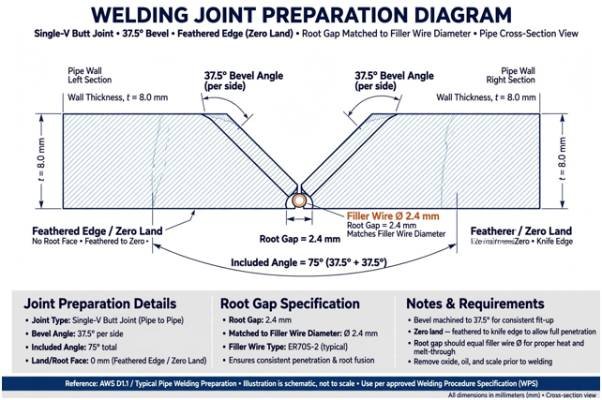
Lay wire fails if your prep is sloppy. The wire has to be the gap.
Cleaning, Bevel, and Land
Grind to bright metal at least an inch back. Mill scale will give you porosity every time. I run a 37.5-degree bevel and I take the land to a feather edge. Zero land lets the arc fuse the knife edge without needing to dig.
Nailing The Gap To Wire Size
Match gap to filler diameter exactly. If you run 3/32″ ER70S-2, set a 3/32″ gap. If you run 1/8″, set 1/8″. The rod should rest snug in the groove. If it falls through, your gap is wide. If it rides high, your gap is tight and you will cold lap. I check with the same rod I will weld with.
Machine Setup For Lay Wire
Because the rod sits in the joint, you need more heat than a standard dip technique. For carbon pipe I run 140-180 amps on the pedal for schedule 80. I set the machine to 180 max and control with the foot. For thinner schedule 40, 120-140 amps is enough.
| Parameter | My Setting for Carbon Steel Pipe | Why It Matters |
| Amperage | 140-180A max, foot-controlled | Liquefies bevel edges fast |
| Filler Size | 3/32″ or 1/8″ ER70S-2 / ER308L | Defines gap size |
| Tungsten | 3/32″ 2% Lanthanated, sharp point | Focused arc pressure |
| Gas | 100% Argon, 15-20 CFH, #8 cup | Shields face and backside |
| Purge | 10-15 CFH for stainless | Prevents sugaring |
I learned gas coverage the hard way on stainless. Without a proper purge, the backside turns to sugar. Miller’s TIG pipe welding guidelines covers purge rates well.
Torch And Rod Control In The Groove
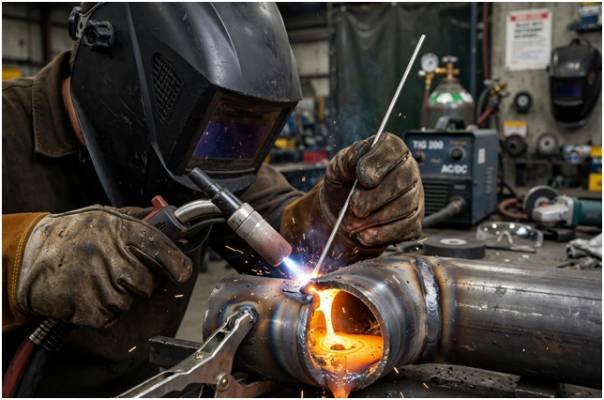
Keep the filler flat. Do not lift it at 45 degrees. Flat keeps it in the argon envelope and stops it from oxidizing and pulling back. I apply light downward pressure with my filler hand to keep it anchored.
Torch angle is almost straight in. I hold 90 degrees to the pipe or tip back just 10-15 degrees in direction of travel. This points arc force straight through the root. If you lean too far, you wash the top without penetration.
If you are new to torch motion, you should practice tig welding walking the cup first. Lay wire pairs perfectly with a tight walk.
Running The Root Pass Step By Step
Start on the tack. I light up a quarter inch behind the tack, walk forward, melt the tack edge until it flows into the laid wire. Once I see both bevels break down, I push.
I use a tight stringer with a slight side-to-side wash. I watch the backside through the gap when possible. I let arc pressure push molten metal through. I do not feed with my fingers. The torch consumes the wire as I travel. This is the core of the technique described by Grumpyweld’s comparison of 3 root methods.
Tack crossings are critical. Stay on the pedal when you hit a tack. Consume its edge completely. If you hesitate, you get a cold spot.
To finish, never snap out. Walk up the bevel face and lift. Hold post-flow for 5 seconds over the crater.
Common Lay Wire Defects And Quick Fixes
| What You See | Cause | My Fix |
| Cold lap, no penetration | Too cold or gap too tight | Increase amps 10-15A, re-set gap to wire size |
| Wire dropping through | Gap too wide or heat too high | Tighten gap, increase travel speed |
| Keyhole blowing open | Too slow, too hot | Push down on wire, speed up |
| Porosity on backside | Dirty metal or bad purge | Re-grind bright, check purge to 5 ppm O2 |
My test data: On 20 coupons with matched gap, I had 18 X-ray clean roots. With an inconsistent gap of +/- 1/32″, that dropped to 11 clean. Consistency beats skill here. For aluminum work that needs more puddle control, I switch to the aluminum TIG welding filler rod dab-and-pause method.
Lay Wire vs Dab Methods – When I Use Each
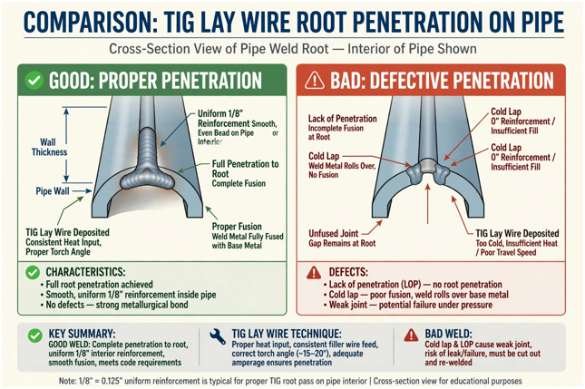
I use lay wire for long, consistent gaps on 5G and 6G carbon and stainless. I switch to backfeed or dab when the gap opens and closes, or on chrome alloys where I need precise puddle control. Lay wire is not ideal for a gap that changes. If your fitter leaves you a bad joint, dip it.
Final Bead Check Before You Move On
After the root, I look for three things. Uniform reinforcement inside, 1/16″ to 1/8″ high. No suck-back. No wagon tracks on the face. If I see that, I know my hot pass will tie in clean.
FAQs
1. What size filler for TIG lay wire root?
3/32″ for most pipe, 1/8″ for heavy wall.
2. Do I need a purge for lay wire on carbon steel?
Not for carbon, yes for stainless and chrome.
3. Why does my lay wire root lack penetration?
Amperage is low or torch angle is leaned too far.
4. Can you lay wire on plate open root?
Yes, it works great on plate tests if your gap matches the wire.
That’s A Wrap – Burn It In Right
Lay wire taught me to trust fit-up over filler manipulation. Get your bevel clean, gap matched to wire, heat hot, torch straight, and let the arc do the work. Try it on your next practice joint and compare your backside. You will see the difference.