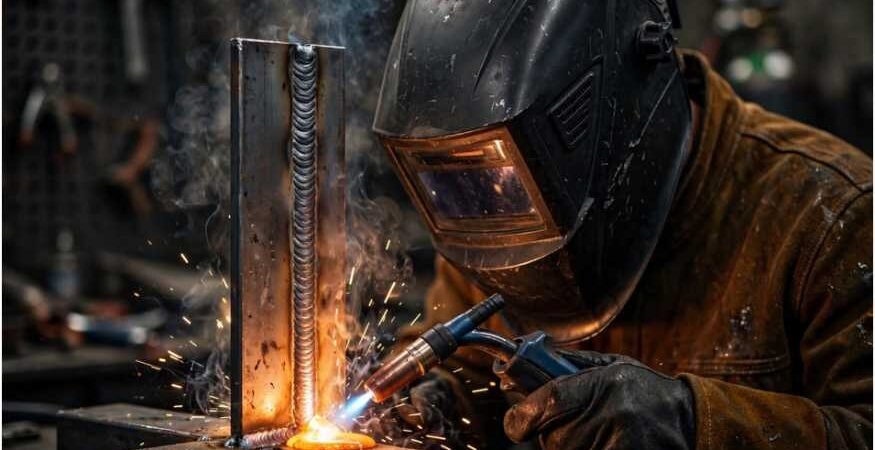
Vertical-up flux core defeats welders the second gravity grabs their molten pool. You pull the trigger, the arc starts hot, and suddenly three inches of molten steel drops onto your work boots. Overcoming this failure requires mastering the flux core vertical up shelf building technique.
By deliberately solidifying an initial ledge of weld metal at the bottom of the groove, you create a mechanical step. This platform catches the active puddle and holds it against the plates until the arc steps upward.
Mastering this technique eliminates common vertical issues like heavy undercut, sagging crowns, and internal slag inclusions. The vertical shelf transforms a chaotic molten pool into a predictable, step-by-step climb.
The Physics of Vertical Up FCAW Freezing
Vertical-up welding forces you to run directly against gravity. Success relies on balancing heat input against puddle cooling rates. Much like mastering a vertical down stick welding 6010 root pass on open pipe, vertical FCAW demands total control over puddle freeze rates.
Surface Tension vs. Hydrostatic Pressure
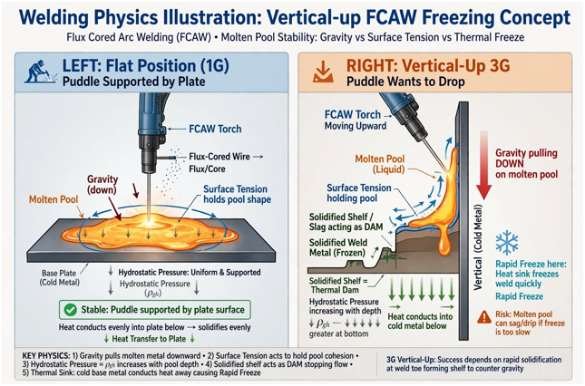
Liquid steel has low surface tension when overheated. In the flat position, the plate supports the fluid weight. In the 3G position, that weight—hydrostatic pressure—pulls the molten puddle toward the floor.
The solidified shelf acts as a structural dam. When your arc advances, heat transfers into the joint sidewalls and the solidified metal below. The colder, pre-deposited metal siphons heat out of the molten pool. This thermal sink enables rapid freezing before the puddle exceeds its critical holding weight.
[ Joint Root ]
|
( Arc ) <– Hold 1/8″ above shelf
~~~~~~~~~~~ <– Active Molten Puddle
[===========] <– Solidifying Shelf (Mechanical Dam)
[===========] <– Solidified Weld Metal
Slag Blanket Dynamics in Shelf Formation
Flux core relies on a chemical slag cover to shape and deoxidize the deposit. Fast-freezing rutile or basic flux agents solidify faster than the base metal. This phenomenon forms an external glass pocket that holds the liquid pool in place.
If you drive the arc into this pool, liquid metal breaches the crust and cascades downward. Keeping the wire strictly on the forward edge of the molten boundary lets the slag freeze sequentially behind the bead.
Baseline Machine Parameters for Vertical-Up Shelf Control
Do not use flat-position parameters for vertical-up welds. High wire speeds overheat the groove, causing the shelf to liquefy and drop. Dial your wire feed speed and voltage back by 10% to 15% to maintain a crisp, stable shelf.
| Wire Type | Wire Diameter | Shielding Gas | Arc Voltage | Wire Feed Speed (WPM) | Target Travel Speed |
| E71T-11 (FCAW-S) | 0.035 in (0.9 mm) | None (Self-Shielded) | 15.0 – 16.5 V | 120 – 145 | 4 – 6 IPM |
| E71T-8 (FCAW-S) | 1/16 in (1.6 mm) | None (Self-Shielded) | 18.0 – 19.5 V | 130 – 160 | 5 – 7 IPM |
| E71T-1M (FCAW-G) | 0.045 in (1.2 mm) | 75/25 Ar / CO₂ | 22.5 – 24.0 V | 220 – 260 | 6 – 8 IPM |
| E71T-1C (FCAW-G) | 0.045 in (1.2 mm) | 100% CO₂ | 23.5 – 25.0 V | 230 – 270 | 6 – 8 IPM |
Source Reference: Parameters derived according to guidelines from Lincoln Electric and Miller Welds.
Step-by-Step Execution of the Shelf Building Process
Executing this technique requires precise muscle memory and keen puddle observation.
Setting the Foundation Anchor
Begin at the lowest point of your plate or joint bevel. Initiate the arc against the backing bar or bottom edge, holding the gun steady without lateral oscillation. Watch for the molten pool to expand to your desired bead width, usually 1.5 to 2 times the wire diameter.
Hold position for one full second. As the molten pool reaches the joint edges, back the arc off slightly. You will see a glowing, semi-solid plateau form under the arc. That plateau is your initial shelf.
Torch Angles and Arc Gap Precision
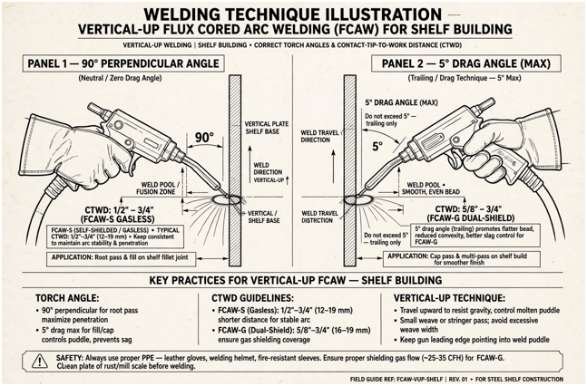
Maintain an angle perpendicular to the joint, or use a maximum 5-degree drag angle. Pointing the gun too high up pushes arc force down into the shelf, washing it out.
Keep your Contact-Tip-to-Work Distance (CTWD) consistent:
- Gasless (FCAW-S): Maintain 1/2-inch to 3/4-inch stickout to preheat the wire core.
- Dual-Shield (FCAW-G): Maintain 5/8-inch to 3/4-inch stickout to ensure complete gas coverage.
Keep your wire focused on the shelf’s upper edge. Never strike down into the solidifying glass blanket.
Reading the Slag Freeze Boundary
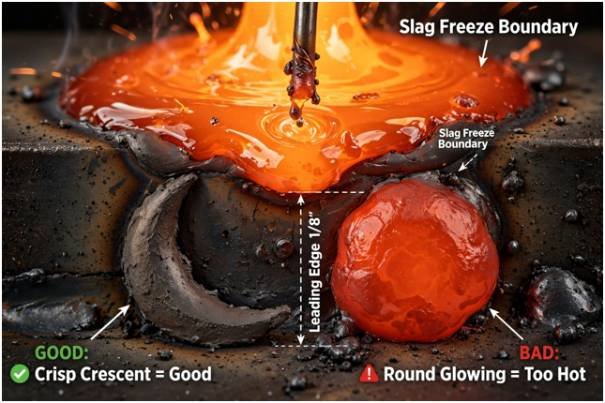
Focus on the boundary line between the molten steel and the crusting slag. In sound vertical-up welding, the slag forms a crisp crescent moon or “thumbnail” shape 1/8 inch behind the arc.
If this crescent rounds out into a circular, glowing mass, the puddle is too hot. Quicken your travel speed immediately to outrun the thermal build-up.
Self-Shielded vs. Dual-Shield Shelf Management
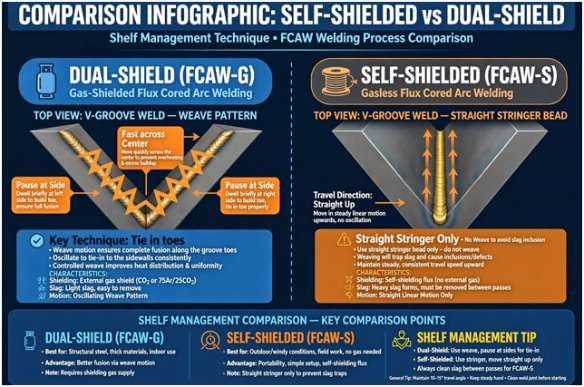
Operating FCAW-S versus FCAW-G demands different gun manipulation strategies to protect shelf integrity.
Dual-Shield (FCAW-G) Gasless (FCAW-S)
=========================== ===========================
Side Center Side Straight
[Pause] —> Fast —> [Pause] Stringer
^ ^ |
+– Tie in toes ——-+ v
Step straight up
Self-shielded wires generate a voluminous, heavy slag matrix. Weaving side-to-side traps this slag along the beveled walls, creating inclusions. Run straight stringer beads with FCAW-S. Rely on the rapid-freezing basic slag formulations specified by the American Welding Society to hold bead shape.
Dual-shield wires run a fluid spray-like transfer under active gas shielding. For wider joints, use a gentle side-to-side weave. Pause at each joint toe for a count of one to burn out undercut and tie in metal. Then, flick across the center quickly. Moving fast through the center prevents excess metal from crowning, keeping the shelf flat.
Managing heat across positions requires similar patience; for instance, learning mig welding overhead position helps you anticipate how fluid metal behaves against gravity.
Diagnostic Troubleshooting: Puddle Drips and Slag Inclusions
When a shelf fails, the shape of the bead shows the root cause. Adjust technique using this diagnostic matrix:
| Visual Defect | Root Mechanism | Immediate Shop Floor Correction |
| Grapes / Drips | Travel speed too slow; wire running too hot. | Lower voltage by 1.0 V; increase upward travel speed. |
| Convex Center Bead | Dwelling too long in center of the weave. | Accelerate traverse across middle; pause only at side bevels. |
| Internal Slag Pocket | Arc directed behind the freeze line. | Position wire squarely on the leading 1/8-inch edge of the puddle. |
| Deep Edge Undercut | Voltage too high; no pause on joint toes. | Drop voltage 1.5 V; hold joint sidewall edges for one second. |
To inspect your weld quality against structural codes, consult structural failure analyses published by The Fabricator.
Frequently Asked Questions
1. Why does my vertical-up flux core puddle keep dropping off the plate?
Your arc voltage is set too high, or you are moving too slowly across the joint center.
2. What torch angle works best for the vertical-up shelf technique?
A perpendicular 90-degree angle or a slight 5-degree drag angle gives the best shelf stability.
3. Should I weave or use stringers for vertical-up FCAW?
Run straight stringers for self-shielded wire, but use tight side-to-side weaves for dual-shield wire.
4. How far ahead of the shelf should my wire arc run?
Direct the arc roughly 1/8 inch ahead of the freezing shelf’s leading edge.
Cold Metal, Hot Arc: Get Up the Plate
Vertical-up flux core comes down to confidence on the shelf edge. Set your machine to the lower side of the parameter window, strike your arc at the root bottom, and let that initial metal foundation solidify before stepping upward.
Maintain a short arc, pause briefly at the toes to tie in your edges, and avoid lingering in the middle. Run a few test plates, cut and etch the stop-starts, and confirm your shelf technique produces clean, sound welds.