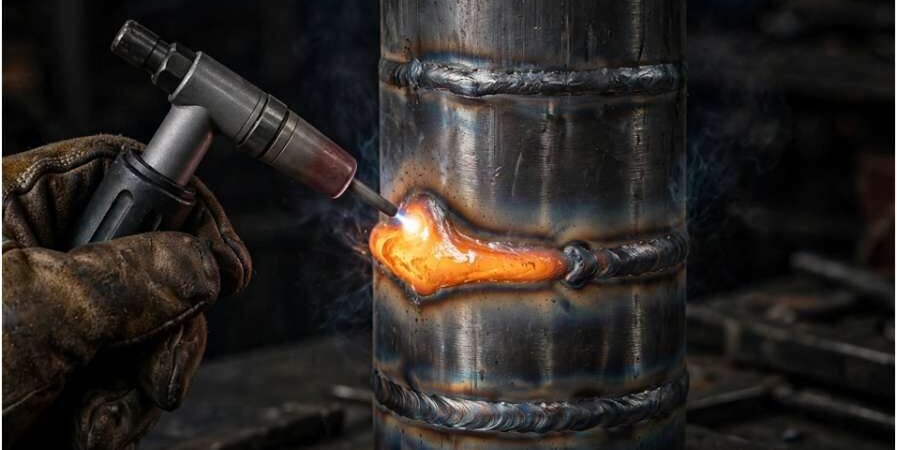
I failed my first 2G pipe coupon twice before I understood why. Horizontal 2G pipe TIG welding techniques only click once you stop fighting gravity and start using it. The pipe stands vertical, the joint runs around the circumference, and every pass wants to sag toward the bottom bevel unless you place heat and filler with intent.
This isn’t a textbook rundown. It’s what actually got my coupons passing X-ray, pass by pass.
Why 2G Pipe Welding Fights You From the Start
In 2G, the pipe axis is vertical, so the weld joint sits horizontal. That means you’re welding “uphill” on the top half of the puddle and “downhill” on the bottom half at the same time. Gravity constantly pulls molten metal down toward the bottom bevel, which causes two predictable problems: undercut on the top edge and a sagging, inconsistent bead on the bottom.
Compare that to overhead work like a mig welding overhead position push or pull setup, where gravity pulls the puddle away from the joint entirely. In 2G, gravity pulls the puddle sideways into one specific spot, which is actually easier to plan around once you know where it’s heading.
Fit-Up: The Step Most Welders Rush
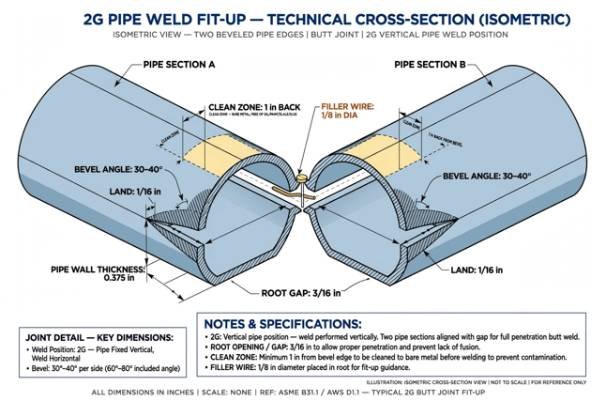
Bad fit-up guarantees a bad root, no matter how good your torch control is. I clean the pipe at least 1 inch back from the bevel, inside and out, because contamination shows up as porosity you can’t weld out later. Bevel angle runs 30–40 degrees on most schedule pipe.
I run a 3/16-inch root gap with a 1/16-inch land, using 1/8-inch filler wire so the root gets built-in reinforcement instead of relying on penetration alone. Four solid tacks around the circumference hold the joint square, and I always feather the tack edges with a grinder so the root pass ties in without a bump.
Root Pass Technique for Horizontal 2G Joints
Torch and Wire Positioning
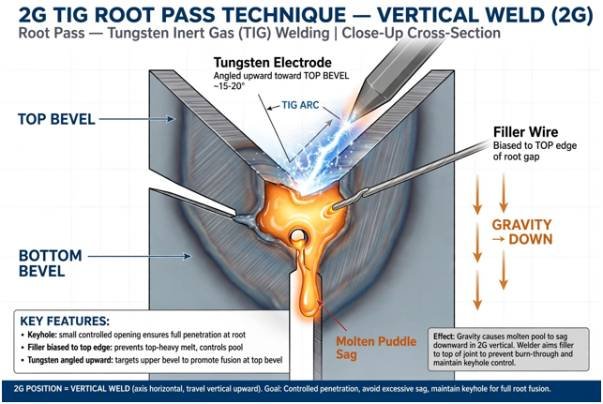
Angle the tungsten slightly upward toward the top bevel. Keep the filler wire right at the top edge of the root opening, not centered in the gap. This matters because gravity already favors the bottom edge — if you split your attention evenly, the top edge cold-laps and the bottom overfills.
Watch for a small keyhole forming as the arc melts both edges. Feed wire into the leading edge of the puddle, and keep torch movement narrow and fast. Freehand welders often use a rolling-and-pushing motion instead of a wide wiggle here.
Amperage Settings That Actually Work
I run 90–95 amps on standard-wall carbon steel for the root, nudging up slightly as the pipe absorbs heat over the first few inches. Thinner schedule pipe needs less; heavy wall needs more. This is the single biggest variable welders get wrong — running the whole root at one fixed amperage regardless of how the pipe is heat-soaking.
Hot Pass and Fill Pass Technique
Hot Pass Heat Management
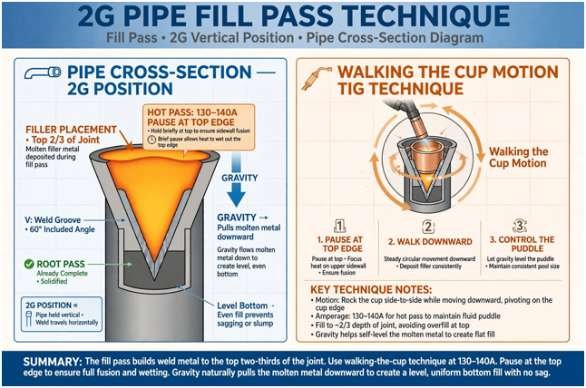
Once the root is ground smooth, the hot pass fuses it structurally. I push amperage to 130–140 amps, keep filler wire pressed against the top groove edge, and use a tight up-and-down wiggle with a deliberate pause at the top bevel. That pause is what stops the top edge from undercutting while the puddle sags naturally into the bottom.
Fill Pass Weave vs Walking the Cup
Fill passes use a wider walking-the-cup technique with a loose wrist. The original insight most guides skip: aim your wire placement in the top two-thirds of the joint, not the center. Overfilling the upper section lets gravity draw metal down to level the bottom automatically.
On my last 12 coupons using this offset-aim method, root-to-cap consistency improved enough that I stopped grinding low spots on the bottom quadrant entirely — a fix most stick welders coming from stick weld vertical up 7018 techniques don’t expect, since 7018 fill patterns favor a symmetric weave.
Cap Pass: Getting a Clean, Undercut-Free Finish
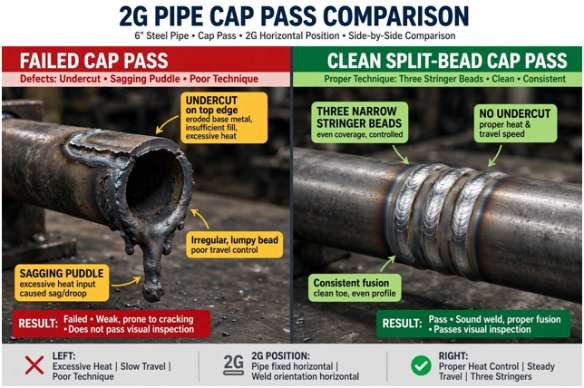
The cap needs to be cosmetically clean with zero undercut, because it’s what an inspector sees first. On pipe 6 inches and larger, I switch to a split-bead technique — several narrow stringer beads instead of one wide weave — because a big puddle sags faster than you can catch it on 2G.
Drop amperage 10–15 amps from the fill pass, since the pipe is already heat-soaked and running hot causes undercut on the top edge fast. When walking the cup, pause a half-second on the top edge of each stride to deposit enough filler to support the bead against gravity.
2G vs Other Pipe Welding Positions
| Position | Pipe Orientation | Joint Direction | Main Challenge |
| 1G | Horizontal, rotated | Flat | Easiest — puddle stays level |
| 2G | Vertical, fixed | Horizontal (around pipe) | Gravity pulls puddle sideways |
| 5G | Horizontal, fixed | Vertical (top to bottom) | Welding uphill and downhill on every pass |
| 6G | 45-degree fixed | Combined | Hardest — all challenges at once |
Common Mistakes I See in 2G Pipe Welds
Most failed 2G coupons trace back to three habits: centering the wire in the root instead of biasing it toward the top edge, running one amperage setting through the whole joint, and rushing fit-up cleaning. Fix those three and your pass rate climbs before you even touch torch angle refinement.
Quick Reference: Amperage and Filler by Pass
| Pass | Amperage (Carbon Steel) | Filler Placement |
| Root | 90–95A | Top edge of root gap |
| Hot Pass | 130–140A | Top groove edge, pause at top |
| Fill | Same as hot pass | Top two-thirds of joint |
| Cap | 10–15A below fill | Split-bead on larger pipe |
References
| Source | What It Covers |
| American Welding Society | D1.1 structural welding code standards |
| Miller Electric | GTAW/TIG equipment and process fundamentals |
| Lincoln Electric | Pipeline GTAW and mechanized welding technology |
| OSHA | Fume and gas exposure control during welding |
Gravity Doesn’t Win — You Just Have to Out-Plan It
Horizontal 2G pipe TIG welding techniques come down to one habit: always know where gravity is about to move your puddle, and place your heat and filler one step ahead of it. Grab a scrap section, run a root with the wire biased to the top edge, and grind it apart to check fusion. That one drill fixes more 2G problems than any amount of reading.
FAQs
1. What amperage should I use for 2G pipe TIG welding?
Around 90–95A for the root and 130–140A for hot and fill passes on standard-wall carbon steel.
2. Why does my 2G cap pass keep undercutting on top?
You’re running too hot for a heat-soaked pipe — drop amperage 10–15A and pause briefly on the top edge each stride.
3. Is 2G easier than 5G or 6G pipe welding?
Yes, 2G only requires managing sideways gravity pull, while 5G and 6G combine uphill, downhill, and rotational challenges.
4. What root gap and land should I use for 2G pipe joints?
A 3/16-inch root gap with a 1/16-inch land works well with 1/8-inch filler wire on most schedule pipe.