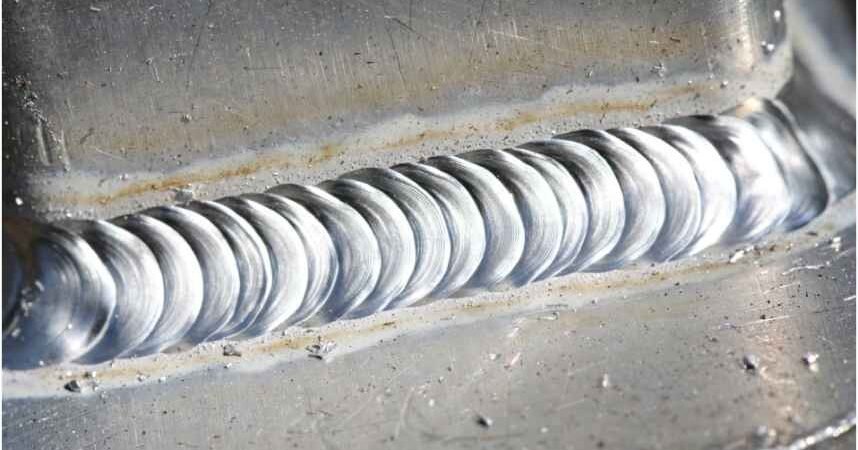
I burned through my first aluminum coupon in under three seconds. The puddle looked fine, then it just fell out. That is exactly why I had to learn the aluminum tig welding filler rod dab and pause method. It is not a stylistic trick. It is heat control.
Aluminum moves heat three times faster than steel and it never changes color before it collapses. You need a rhythm that adds metal, chills the puddle, and moves forward before heat builds up. That rhythm is step, pause, dab.
What The Dab and Pause Actually Controls
When you hold an arc on aluminum, the puddle grows aggressively. If you feed wire continuously, you outrun your gas coverage and overheat the base metal.
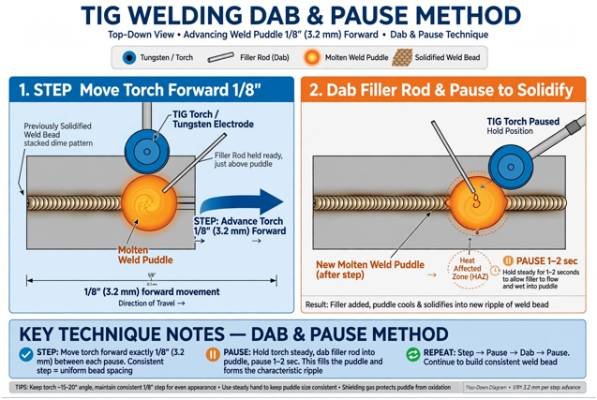
The pause breaks that cycle. You push the torch forward 1/8″, you pause to let the leading edge re-melt, you tap filler into the liquid, not the arc, and you pull back just enough to keep the rod tip shielded. Each pause lets the previous dab freeze slightly. That is what creates the distinct stack of dimes.
I used to struggle with freehand consistency until I learned torch bracing. If you are still deciding between bracing styles, this breakdown on TIG welding walking the cup vs freehand helped me lock my arc length at a steady 1/8″.
My 1/8-Inch Test That Proved Why Rhythm Matters
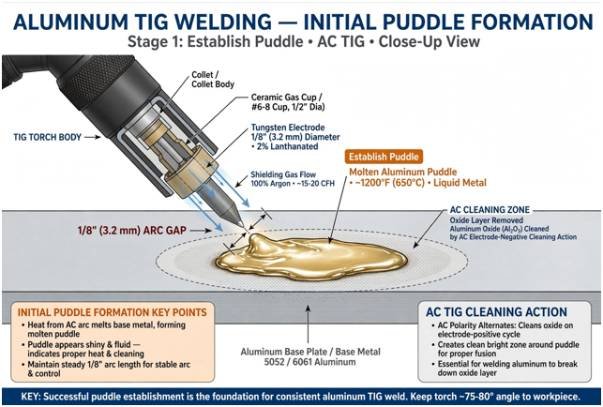
Most tutorials say “find your rhythm.” I wanted a number. On 1/8″ 6061-T6, outside corner joint, 125A max on AC, 100% argon at 15 cfh, 3/32″ 2% lanthanated, #8 cup, I ran two beads.
First bead I stepped 1/4″ per dab. Result: wide, flat, gray wash, 11 dabs per 6 inches. Second bead I stepped 1/8″ per dab with a deliberate 0.8-second pause. Result: tight ripples, shiny cleaning band, 19 dabs per 6 inches, zero sag on the backside.
Same amps, same coupon. The difference was only advancement distance and pause discipline. That 0.8-second pause is now my default timer.
The Setup I Used
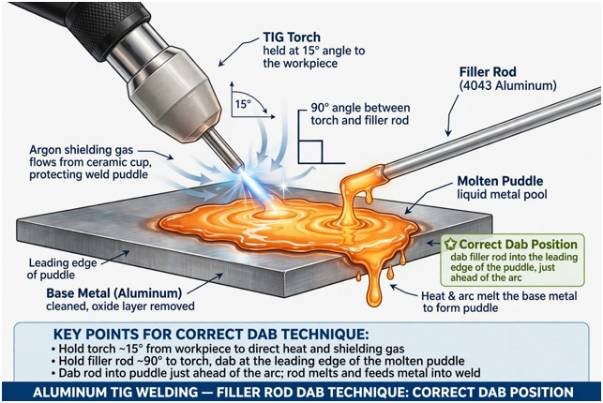
AC balance 70% EN, frequency 120Hz, 4043 filler 3/32″. I kept the torch at 15 degrees push angle and the rod at almost 90 degrees to the torch. The American Welding Society notes that AC provides the cathodic cleaning needed to break up aluminum oxide, which is why you see that frosty zone form before the puddle goes wet. Miller’s aluminum guide also stresses letting the puddle melt the filler, not the arc.
Aluminum TIG Welding Filler Rod Dab and Pause Method Step by Step
Step 1 – Establish and Chill The Puddle
Start your arc and form a mirror-like puddle. Do not admire it. Aluminum will fall through if you linger. Immediately feed one to two quick dabs.
Jody from Welding Tips and Tricks calls this the “fill and chill” – you are adding material and pulling heat out of the puddle at the same time to stabilize it. This is especially important at the start of the joint where the plate is cold and you tend to over-pedal.
Step 2 – Step, Pause, Dab
Now lock into the loop. Push forward about 1/8″. Pause. Your arc should now be on fresh base metal at the leading edge. Dab the rod into the front third of the puddle. Pull the rod back 1/4″ to 1/2″ but keep it under the gas shield. Repeat.
The torch moves, then stops. The rod moves, then stops. They never move together. If you move while dabbing, you will stub tungsten. Your foot pedal stays mostly flat. You are not pumping it.
You are controlling heat with filler addition and travel. This discipline transfers directly when you move to pipe. I use the same pause logic for horizontal 2g pipe tig welding techniques where gravity wants to sag the puddle.
Choosing Your Filler Rod For This Technique
Rod choice changes how the dab feels.
| Filler Alloy | How It Feeds In Dab and Pause | Best Use | My Note |
| 4043 | Very fluid, flows smooth, low crack sensitivity | General fab, cast to wrought, 6061 | Easiest to learn the rhythm with |
| 5356 | Stiffer puddle, needs slightly more heat, stronger | 5052, 5086, 6061 where strength and anodize match matter | Better color match after anodizing |
For this method, 3/32″ rod on 1/8″ material gives you enough chill per dab without needing to double-feed. If you use 1/16″ rod, you will need two dabs per step.
3 Mistakes That Ruin Your Dimes
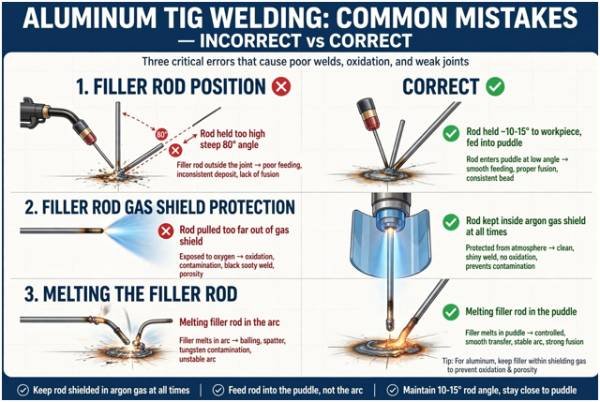
- Melting rod in the arc. If you lift the rod into the bright arc, it balls up, oxidizes, and spits. The puddle must melt the rod. Keep the rod low and tap the puddle edge.
- Pulling the rod too far out. I did this for months. You pull back 2 inches, the hot tip oxidizes in air, you bring it back and get black pepper flakes in the bead. Keep the tip within the visible gas envelope.
- Stepping too far. A long step makes wide, separated dimes and a cold lap in between. Tight steps make tight dimes. If your bead looks like spaced-out coins, shorten your step, not your amps.
At the end of the joint, add one final dab and slowly ramp down your pedal over 2-3 seconds while making a tiny circle. This fills the crater. Crater cracking is the number one failure I see on aluminum coupons.
FAQ
1. How fast should aluminum TIG dab and pause rhythm be?
About one dab every 0.8 to 1.2 seconds on 1/8″ aluminum once the puddle is moving.
2. Why does my aluminum rod ball up instead of flowing?
You are melting it in the arc, not the puddle, or pulling it out of gas coverage between dabs.
3. What amperage for aluminum TIG dab and pause on 1/8 inch?
Set machine to 125A max and control to about 90-100A on the pedal once moving.
4. Is dab and pause better than lay wire for aluminum?
Yes for learning and for most joints. Lay wire adds constant heat and needs very fast travel to avoid burn-through.
Stop Dragging, Start Dabbing
The aluminum tig welding filler rod dab and pause method is not about looking pretty. It is a heat management system. Tight step, brief pause, quick tap in the puddle, short pullback.
Run a six-inch practice coupon and count your dabs. If you are under 15, shorten your step. If you are over 22, you are moving too slow. Dial that 0.8-second rhythm in and your aluminum will stop collapsing.