
I ruined my first pulse MIG beads because I treated it like short-circuit MIG. I whipped, I weaved, I tried to stack dimes. The result was porous, uneven, and spattered. The pulse mig puddle manipulation technique is structurally different, and once I learned to do less, my welds got twice as good.
Unlike short-circuit transfer, pulsed MIG is a modified spray transfer. The machine pulses high peak current to detach one droplet per pulse. That creates a puddle that is hotter, more fluid, and faster-freezing than you expect. You don’t build the puddle. You guide it.
Why Pulsed MIG Puddles Act Differently Than Short-Circuit MIG
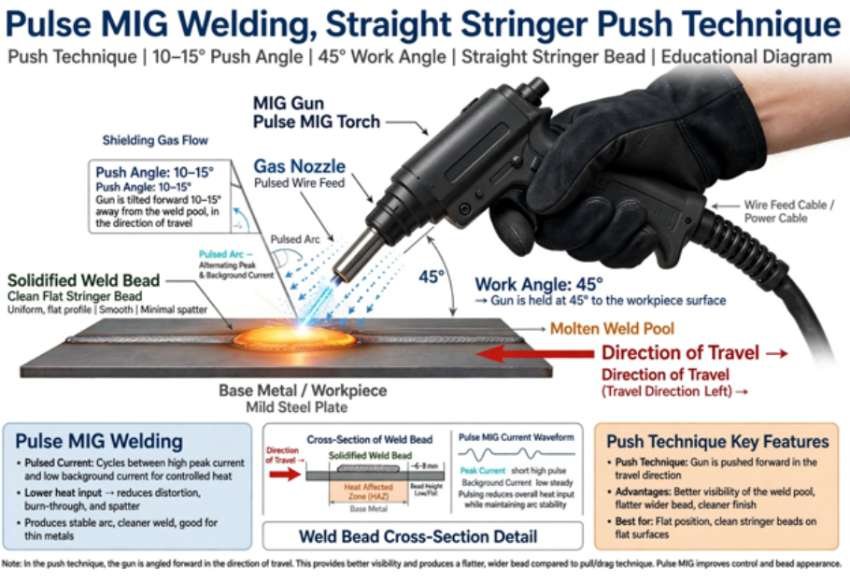
In short-circuit, you manipulate to control heat and build reinforcement. In pulse, the electronics already do that.
According to Miller Electric, pulsed MIG reduces spatter and provides better control on thin and thick materials by pulsing between low background and high peak current millerwelds.com. Lincoln Electric confirms it offers spray-like quality at lower average heat lincolnelectric.com. That electrical control is why manual whipping disrupts shielding gas and penetration.
UNIMIG Welding also notes pulse MIG produces a highly fluid puddle that requires minimal torch manipulation unimig.com.au.
The Core Technique I Use: The Straight Stringer Push
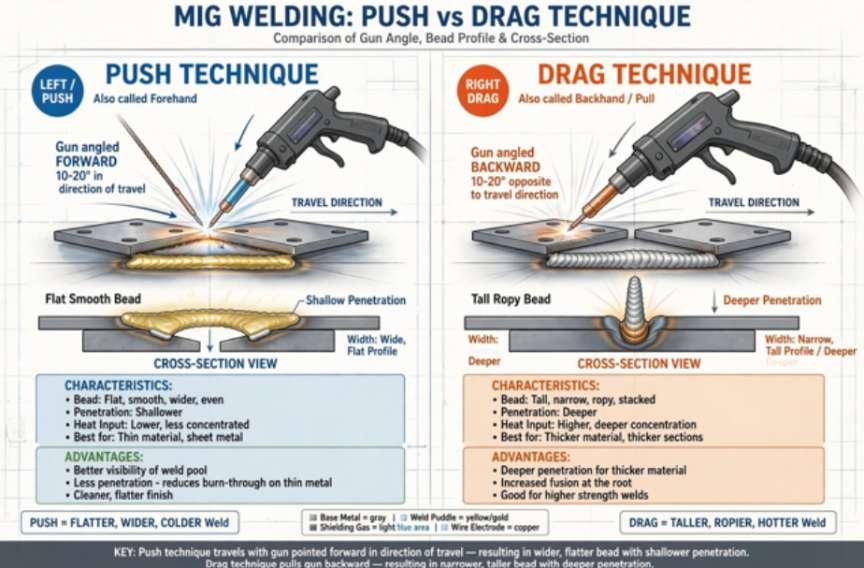
My go-to for 90% of pulse work is a straight stringer while pushing. No weave. No circles. Just a consistent, swift travel speed.
I learned to keep the puddle width restricted to roughly 5 to 6 times the wire diameter. If I run .035″ wire, my puddle should never be wider than about 3/16″ to 1/4″. If it gets wider, I am moving too slow. This one data point fixed my crown height issues instantly.
Why Pushing Beats Dragging Every Time
Always push the gun — point it 10 to 15 degrees in the direction of travel. Pushing directs arc energy at the leading edge of the puddle. That gives a flatter bead profile and cleaner gas coverage.
Dragging traps gas and builds a tall, ropey bead with poor toe tie-in. If you are used to the traditional drag for flux-core, this feels wrong at first, but your X-ray will prove it.
This is different from what I do when I compare mig welding cursive e vs crescent pattern in short-circuit mode, where manipulation is required for tie-in.
The Stickout Mistake That Ruins Pulse MIG
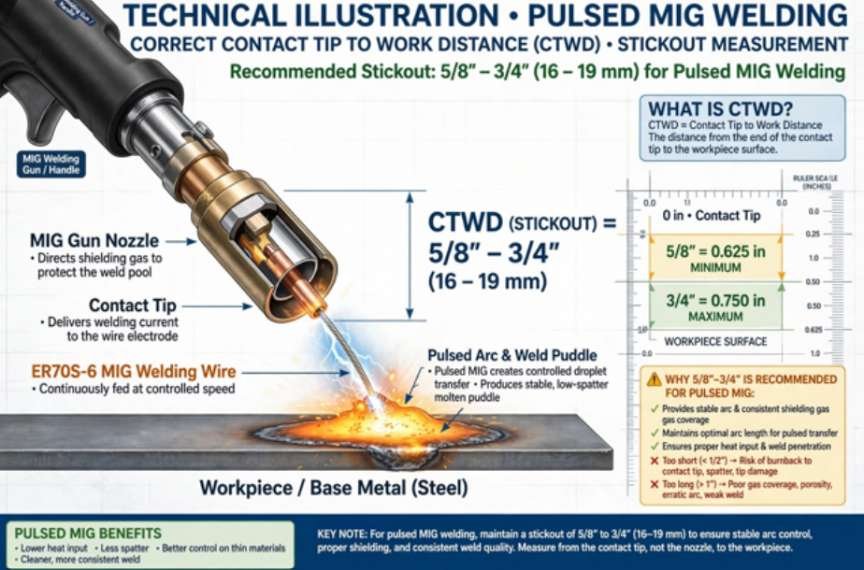
Hold a long contact-tip-to-work distance. I run 5/8″ to 3/4″ minimum, up to 1″ for heavy spray. With a tight short-circuit stickout of 3/8″, the process becomes erratic and spatters heavily because you choke the preheat of the wire. YesWelder’s guide on pulsed MIG also emphasizes maintaining longer stickout for stable arc yeswelder.com.
| Parameter | My Setting for Pulse MIG | What Happens If Wrong |
| Work Angle | 45 degrees on fillet | Uneven leg size, undercut on one side |
| Travel Angle | 10-15 degree push | Poor gas coverage, tall crown if dragged |
| Stickout (CTWD) | 5/8″ – 3/4″ | Erratic arc and spatter if too short |
| Travel Speed | Swift, uniform | Puddle over 6x wire diameter = too slow |
When You Actually Need to Manipulate the Puddle
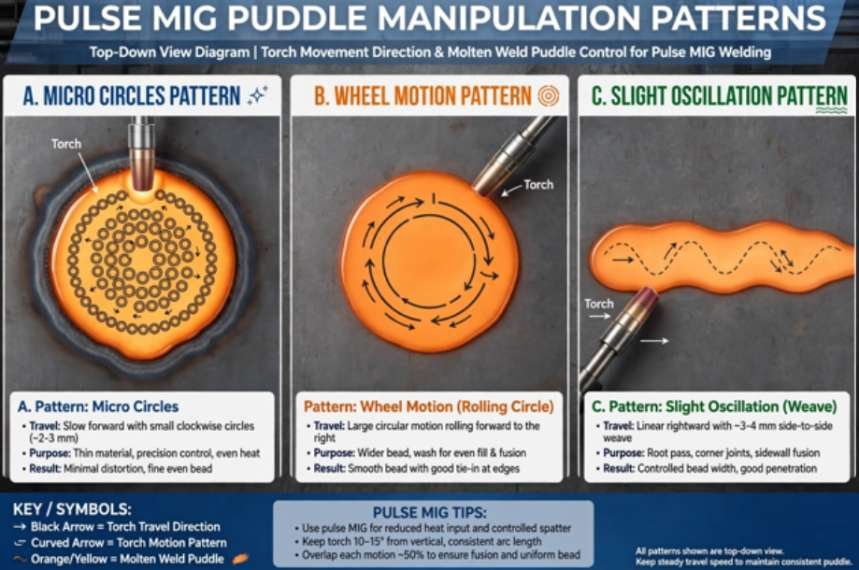
Sometimes a straight stringer won’t fuse both walls in a wide groove or tight fillet. When I must move, I keep it incredibly tight. Wrist only. No elbow swing.
| Manipulation | How I Execute It | Best Use Case |
| Micro Circles | Tiny forward-facing circles, under 1/4″ diameter | Broadening bead slightly on thick plate |
| The Wheel Motion | Puddle up, then roll forward in a tiny arc, advancing one material thickness per roll | Fillet welds to prevent undercut and bulging |
| Slight Oscillation | Subtle side-to-side wiggle using fingers only | Spreading a lagging fluid puddle |
How Trim and Arc Length Control Puddle Fluidity
Your trim setting is your puddle fluidity knob. This is more effective than any hand motion.
If the puddle is cold, tall, and crowning, increase arc length / trim. This widens the arc cone and makes the puddle more fluid. If the puddle is sagging, especially out-of-position vertical, decrease trim. This tightens the arc and makes it fast-freezing.
Learning to control heat input on thin sheet metal mig welding taught me this balance. On 16-gauge, I run trim 2-3 points lower than on 1/4″ plate to keep the puddle from falling out.
| Puddle Symptom | Trim Adjustment | Result |
| High crown, poor wetting, ropey | Increase trim / arc length | Wider, more fluid puddle |
| Sagging, dripping, too fluid | Decrease trim / arc length | Tighter, fast-freezing puddle |
| Stubbing, erratic wire | Increase stickout slightly + check trim | Smoother droplet detachment |
My Field-Tested Settings for Common Joints
For .035″ ER70S-6 with 90/10 gas: On a 3/16″ horizontal fillet, I run 180 IPM wire feed, trim at 50, and push at about 12 IPM travel speed. On a vertical-up 1/8″ butt, I drop to 140 IPM and trim to 45, using the wheel motion. The bead stays flat because I let the pulse handle freezing.
That’s The Secret: Do Less, Better
Stop trying to impress the puddle. Pulse MIG was designed so you don’t have to. Master the straight stringer push, nail your 3/4″ stickout, and learn your trim. If you must move, keep it under 1/4 inch. Let the machine do the heavy lifting.
Try one plate with your old whip technique and one plate with a dead-straight push and same parameters. The difference will make you a convert.
Frequently Asked Questions
1. Can you whip or weave with pulsed MIG?
No, whipping disrupts gas coverage and the electronic fast-freeze control, causing porosity and uneven penetration.
2. What is the best travel angle for pulse mig puddle manipulation technique?
A 10-15 degree push angle, pointing in the direction of travel.
3. Why is my pulsed MIG spattering so much?
You are likely holding too short a stickout. Increase CTWD to 5/8″-3/4″.
4. Do you push or drag pulsed MIG on aluminum?
Always push, with an even longer stickout and higher push angle to clean the oxide ahead of the puddle.