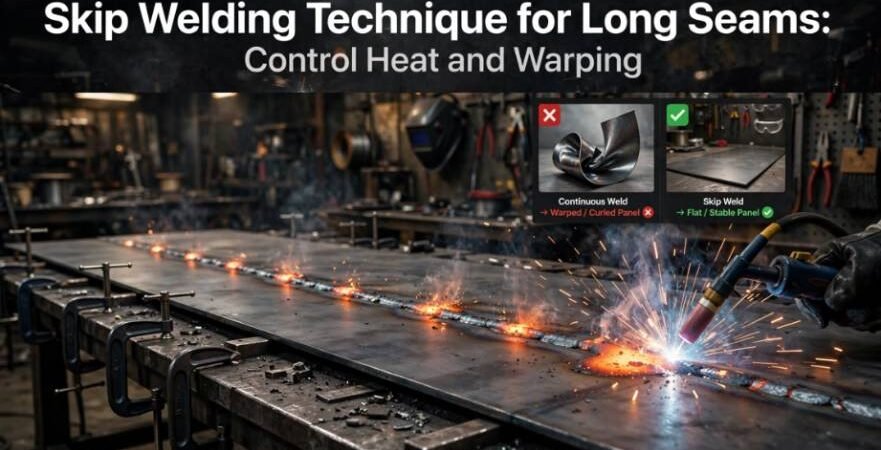
Few things are more frustrating in metal fabrication than watching an eight-foot sheet panel curl off the table like a potato chip. When running a continuous pass down a joint, heat accumulates rapidly, expanding the parent metal while the trailing cooling bead contracts under severe tension.
Over the years, I have saved countless thin panels and heavy plate assemblies from the scrap bin by relying on the skip welding technique for long seams. Spreading thermal input across space and time neutralizes buckling stresses while producing code-compliant, structurally sound seams.
The Physics of Thermal Distortion on Long Seams
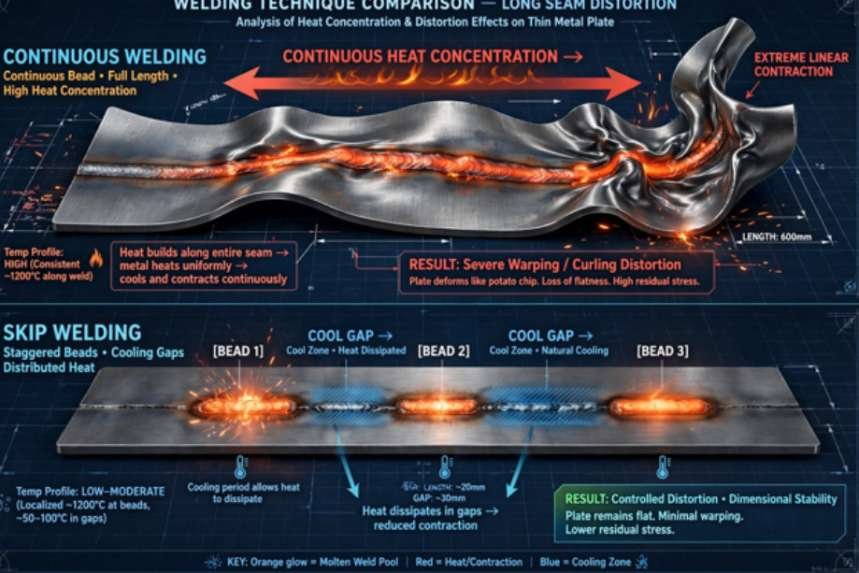
Every electric arc process concentrates intense thermal energy into a tiny focal zone. As the molten puddle solidifies, liquid-to-solid phase shrinkage pulls the base metal inward. If you lay a continuous bead from edge to edge, that shrinkage stress compounds linearly along the joint axis.
Continuous Welding (Heat Concentration):
[=================================================>] –> Extreme Linear Contraction
Skip Welding (Distributed Heat Dispersion):
[Bead 1] —> [Cool Gap] —> [Bead 2] —> [Cool Gap] —> [Bead 3]
According to technical research by The Welding Institute (TWI), completing long runs in one continuous direction creates unbalanced angular distortion and severe bowing. Skip welding interrupts that progressive buildup. It deposits short, predetermined runs that freeze independently, transferring mechanical stress into rigid cold zones rather than pulling unrestrained plate edges.
Longitudinal Shrinkage vs. Transverse Pull
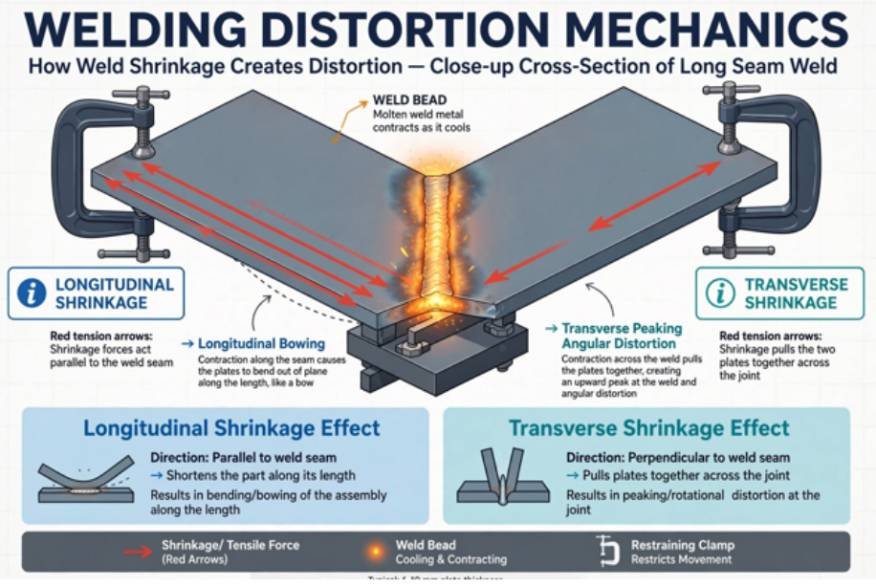
On long joints, two distinct stresses fight your clamps:
- Longitudinal Shrinkage: The weld contracts parallel to the seam, attempting to shorten the entire part length.
- Transverse Shrinkage: As the weld cross-section chills, it draws the two mating plates together across the joint line.
| Distortion Mechanism | Root Cause in Long Seams | Skip Welding Countermeasure |
| Longitudinal Bowing | Continuous directional heat path | Splits shrinkage force across separated segments |
| Transverse Peaking | Non-uniform through-thickness cooling | Limits accumulated molten volume per cycle |
| Edge Camber | Unbalanced cooling on asymmetrical parts | Balances heat distribution around the neutral axis |
| Panel Buckling | Thermal expansion exceeding critical load | Keeps local interpass temperatures below buckling thresholds |
Step-by-Step Execution: Nailing the Sequence
A successful skip weld requires disciplined layout and strict process control. Skipping randomly creates chaotic heat pockets that cause unexpected kinks.
1. Robust Joint Tacking
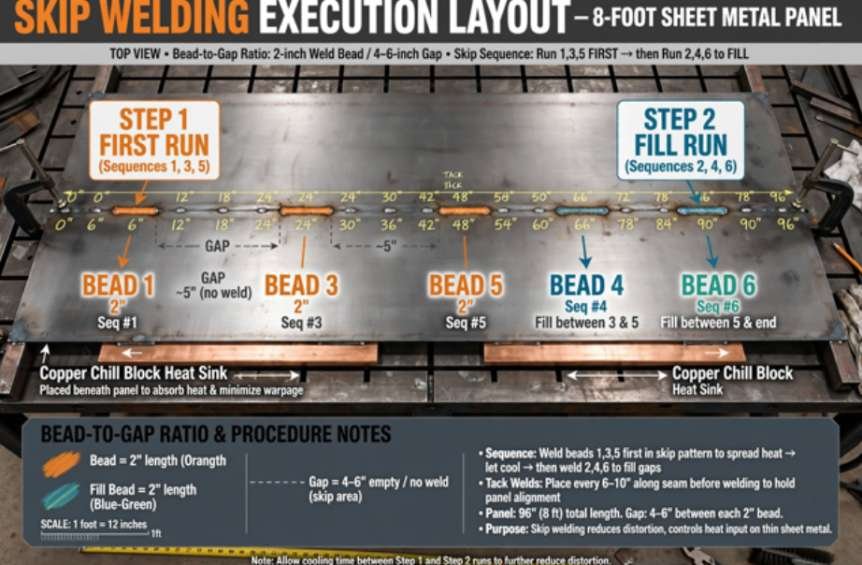
Never skimp on your fit-up. Secure tack welds every 6 to 10 inches along the joint to resist transverse contraction during initial passes. On critical work, clamping copper chill blocks directly underneath the joint extracts heat faster and preserves joint geometry.
2. Calculate the Bead-to-Gap Ratio
The standard field rule calls for laying a bead segment of length $L$ (typically 2 to 3 inches), skipping an open space equal to $2L$ to $3L$, and striking the next arc.
Bead Length: 2″ | Gap: 4″ to 6″ | Sequence: 1, 3, 5, then fill 2, 4, 6
3. Lay the Primary Run
Deposit bead 1, lift off, and leap down the seam to deposit bead 2. Ensure each segment ties in smoothly. If you are burning stick on open roots, deploying a controlled whip and pause stick welding technique helps govern root penetration without overheating the bevel edges.
4. Interpass Thermal Dissipation
Allow the primary segments to cool below 250°F (120°C) before filling intermediate gaps. Use a temperature-indicating stick or an infrared thermometer to verify heat dissipation.
5. Intermediate Tie-Ins
Return to fill the skipped spaces. As each segment closes an open gap, feather the stop-and-start points to prevent craters. When transitioning between electrodes, a calibrated stick welding tie in technique stop and restart prevents crater cracking, slag entrapment, and cold lap.
Skip Welding vs. Backstep Welding: Process Comparison
Fabricators often treat skip and backstep welding as interchangeable, but they solve different heat dynamics. Guidance from Lincoln Electric highlights that backstepping relies on opposing local travel direction against global progression, whereas skip welding isolates heat pockets by physical distance.
| Operational Metric | Standard Continuous | Backstep Welding | Skip Welding | Modified Skip-Backstep |
| Progression Pattern | Linear start-to-finish | Step backward into cold bead | Skip forward, fill later | Skip forward, weld backward |
| Distortion Mitigation | Minimal (Highest Risk) | Moderate (Transverse) | High (Longitudinal) | Maximum Distortion Control |
| Interpass Heat Control | Very Low | Moderate | Excellent | Superior |
| Best Fit-Up Geometry | Heavy stiff plates (>0.5″) | Structural plate girders | Sheet metal & thin plate | Stainless & thin alloys |
For extreme distortion risks—such as 16-gauge austenitic stainless steel—combine both methods. Skip ahead four inches, then direct your travel angle backward into the previous bead’s cold edge.
Tie-In Integrity and Bead Profile Control
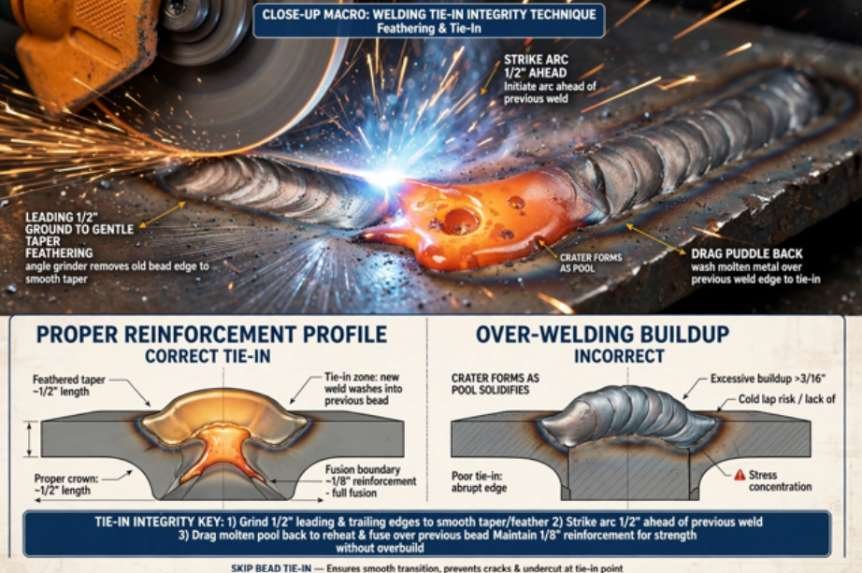
The primary technical critique of skip welding is the sheer volume of stops and restarts. Every restart represents a potential flaw: lack of fusion, crater cracking, or slag inclusions.
Standard welding codes published by the American Welding Society (AWS) require 100% volumetric integrity on structural seams. When executing intermediate tie-ins:
- Feather the Cratering: Grind the leading and trailing 1/2 inch of every skip bead to a gentle taper before filling the gaps.
- Strike Ahead: Strike your arc roughly 1/2 inch ahead of the feathered crater, drag the molten puddle back to wash over the previous weld edge, and then reverse forward to continue the run.
- Control Reinforcement: Avoid excess weld buildup. Over-welding introduces surplus filler metal, which amplifies cumulative cooling shrinkage forces.
Troubleshooting Common Skip Welding Pitfalls
- Plate Separation at End of Joint: Plates can drift apart if unconstrained ends expand unchecked. Clamp strongbacks at joint terminations or weld toward an unconstrained end.
- Excess Porosity at Fill Intersections: Strike points often run cold. Increase your starting current or pause slightly over the tie-in shelf to burn out surface impurities.
- Angular Distortion from One-Sided Passes: Alternating sides across a double-V prep balances shrinkage across the plate’s neutral axis.
Stop the Buckling Before It Starts
Long seam distortion is an engineering challenge, not an unavoidable workshop hazard. Laying continuous passes down an unrestrained six-foot joint wastes hours of torch-straightening and hydraulic press work.
Mark your skip increments before striking the first arc, keep your tacks substantial, and feather every restart. Let physics work in your favor instead of fighting warped plate at the end of the day.
Frequently Asked Questions
1. What is the recommended bead length for skip welding?
Bead lengths typically run 2 to 3 inches, paired with gaps two to three times that length before starting the next pass.
2. Does skip welding reduce joint strength compared to continuous welds?
Properly executed skip welds with sound tie-ins deliver identical mechanical strength to continuous passes.
3. Can I use the skip welding technique on aluminum?
Yes, but you must monitor interpass temperatures closely, as aluminum’s high thermal conductivity rapidly heats the entire assembly.
4. What is the difference between skip welding and stitch welding?
Stitch welding leaves skipped spaces permanently open for non-sealed joints, whereas skip welding returns to fill every gap completely.