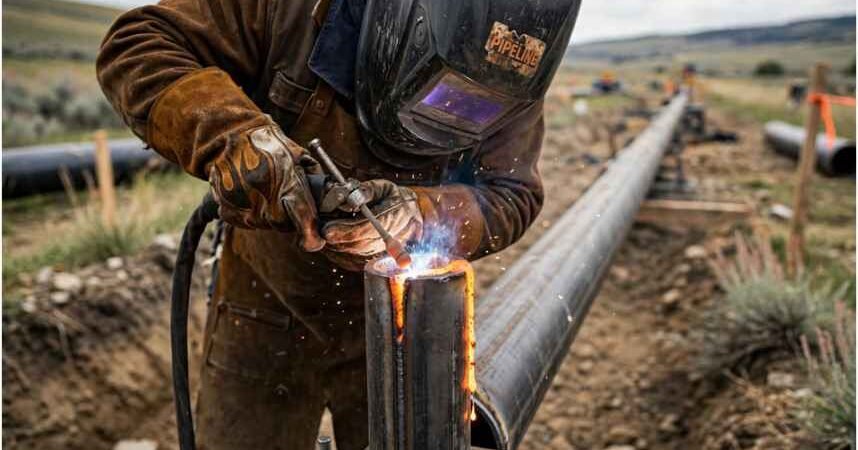
Nothing exposes sloppy technique faster than a vertical down stick welding 6010 root pass. In cross-country pipelining, vertical down progression isn’t an artistic choice—it is a production necessity. Downhill welding moves three to four times faster than uphill progression, but gravity works against your molten puddle every millimeter of the run.
When I burned my first downhill root on 6-inch Schedule 40 pipe, I blew a hole through the landing within four inches because I treated the cellulosic rod like a standard fill pass. Downhill 6010 welding does not rely on puddling or stacking freeze-melt shelves. It relies entirely on arc force, keyhole stabilization, and maintaining continuous forward drag pressure.
TRAVEL DIRECTION: DOWNWARD ↓
Electrode (E6010)
\ 5° to 15° Drag Angle (pointing up)
\
\ <– Inward pressure directly into the groove
═════════\═════════ Pipe Bevel (30°)
\ \
\ (•) <—– Active Keyhole (1/8″ max)
\____/
═══════════════════ Solidified Internal Root Reinforcement (1/16″ Flush/Convex)
Joint Geometry and Fit-Up Parameters
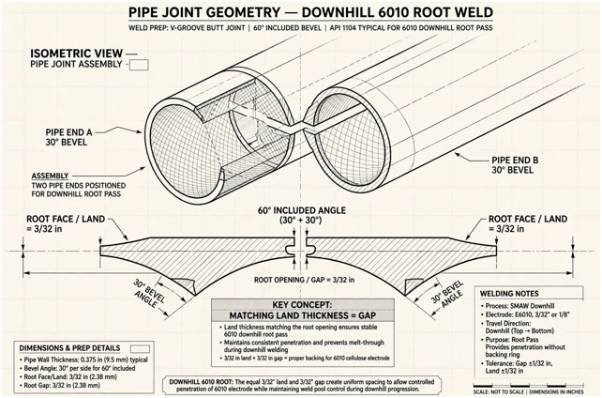
A successful downhill root pass is won or lost during bevel prep. If your fit-up is uneven around the circumference, you will fight continuous cycles of burn-through and cold lap.
Downhill welding produces significantly less heat input per linear inch than an uphill pass because travel speed is so high. Because of this, you need a distinct root opening and land to allow the digging arc of an E6010 cellulosic electrode (such as a Lincoln 5P+) to punch clean through the back wall.
Balancing the Gap and the Land
Match your land thickness directly to your root gap. If you leave a razor-sharp feather edge (knife-edge land) with an open gap, the aggressive sodium cellulose coating will vaporize the bevel instantly.
| Pipe Schedule / Wall Thickness | Electrode Diameter | Bevel Angle (Per Side) | Root Face (Land) | Root Opening (Gap) |
| Sched 40 (0.280″) | 1/8″ E6010 | 30° (60° Included) | 3/32″ (± 1/64″) | 3/32″ |
| Sched 80 (0.432″) | 1/8″ or 5/32″ E6010 | 30° to 37.5° | 3/32″ | 1/8″ |
| Thin Wall (< 0.188″) | 3/32″ or 1/8″ E6010 | 30° | 1/16″ | 1/16″ to 3/32″ |
A 3/32-inch land paired with a 3/32-inch gap provides the most forgiving sweet spot for standard pipe. It gives enough steel mass on the shoulders to support the arc without starving the interior penetration.
Tack Welds and Feathering Technique
Place four bridge tacks at 12, 3, 6, and 9 o’clock. Do not leave heavy, blunt tack faces.
Take a 1/8-inch or thin zip wheel on an angle grinder and feather both ends of every tack until they taper to a paper-thin wedge. When you drag your root down into a feathered tack, the arc consumes that slope seamlessly, ensuring zero internal suck-back or cold lack of fusion at your tie-in points.
Machine Setup and Arc Dynamics
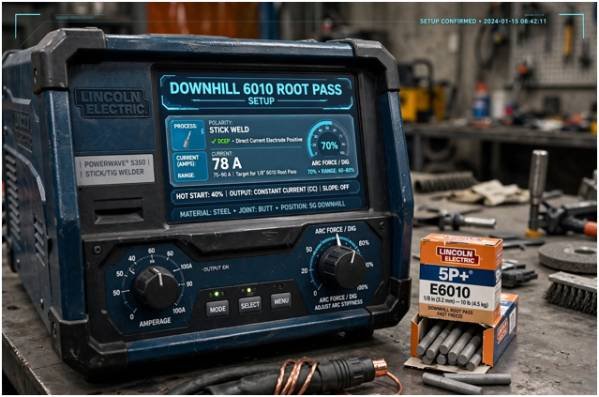
E6010 electrodes run on Direct Current Electrode Positive (DCEP / Reverse Polarity). The deep penetration comes from cellulose in the flux breaking down into carbon monoxide, hydrogen, and steam under arc temperatures, creating an intense, pressurized gas jet.
+————————————————————-+
| DOWNHILL 6010 PARAMETER WINDOW |
| |
| Electrode: 1/8″ E6010 (5P+) |
| Polarity: DCEP (Electrode Positive) |
| Current: 75 – 90 Amps (Machine output dependent) |
| Arc Force / Dig: Set to 60% – 80% (Prevents sticking) |
+————————————————————-+
Dig Control and Amperage Window
Set your base amperage between 75 and 90 amps for a 1/8-inch rod. If your welding machine includes an Inductance or Arc Control (“Dig”) knob, dial it up to 60%–80%. High dig increases voltage when arc length drops, keeping the rod alive even when you shove it tightly into the root opening.
If you are accustomed to how a stick weld vertical up 7018 behaves, this will feel counterintuitive. With low-hydrogen 7018, you hold a close, gentle arc to preserve shielding gas. With 6010 downhill, you bury the rod into the gap and let the mechanical force of the arc blast through the joint.
Running the Downhill Bead: The Physics of Arc Pressure
Begin at the 12 o’clock position (top dead center). Strike the arc roughly 1/2 inch ahead of where you want to weld, drag it back to the start, and push the electrode directly into the root.
Maintain a 5- to 15-degree upward drag angle. Your rod tip points slightly backward at the solidifying bead above you. This angle forces the arc jet to push molten puddle metal back up the hill, stopping gravity from dumping liquid slag ahead of your arc.
Apply continuous, moderate inward physical pressure. You should feel the core wire buzzing against both shoulders of the bevel.
The Acoustic Keyhole Diagnostic
The most reliable sign of a sound root pass isn’t what you see through your lens—it is what you hear:
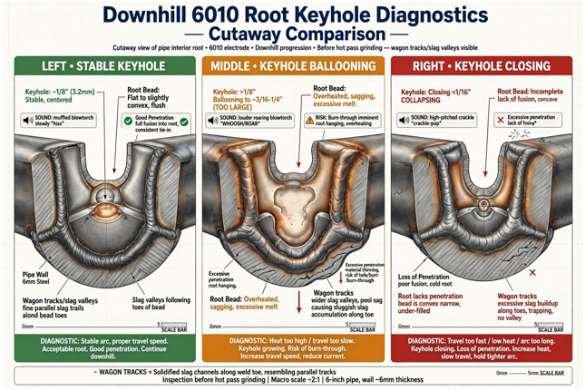
- The Muffled Blowtorch (Sound Penetration): When the keyhole is established properly, the arc sound changes from a crisp surface sizzle to a hollow, muffled jet sound echoing from the inside of the pipe. The sound tells you the arc force is venting through the interior.
- The High-Pitched Crackle (Loss of Penetration): If the pitch turns sharp, the arc has moved entirely onto the bevel face. You have lost the keyhole and are riding on top of the root.
Managing Burn-Through and Losing the Hole
Watch the leading edge of your puddle. A stable keyhole should stay around 1/8 inch across—never larger than the diameter of your rod coating.
KEYHOLE TROUBLESHOOTING DYNAMICS:
Keyhole Ballooning (> 1/8″)?
───► Jam the rod tighter into the gap (shortens arc length, drops arc voltage).
───► Accelerate downhill travel speed instantly.
───► If the opening tears open, pull the arc, grind clean, and restart.
Keyhole Closing (Losing Penetration)?
───► Pull back 1/32″ to slightly lengthen the arc (raises arc voltage/heat).
───► Pause forward travel for a fraction of a second until the hole reopens.
───► Resume continuous downward drag.
Vertical Down vs. Vertical Up: Structural Differences
Pipe welders working under API 1104 pipeline standards rely on downhill cellulosic root passes for production speed. In contrast, pressure vessels governed by ASME Section IX frequently mandate uphill progression using low-hydrogen or TIG roots.
| Variable | Vertical Down 6010 Root | Vertical Up 6010/7018 Root |
| Travel Speed | 10 to 14 inches per minute | 3 to 5 inches per minute |
| Heat Input (kJ/in) | Low (Fast progression minimizes soak) | High (Methodical progression builds heavy heat) |
| Root Profile | Flat to slightly convex/flush interior bead | Pronounced convex reinforcement shelf |
| Slag Tendency | Fluid, thin slag blown backward | Dense slag frozen beneath the weld shelf |
| Primary Code | API 1104 (Cross-country transmission) | ASME Sec. IX / AWS D1.1 (Structural & Plant) |
The differences here mirror the distinct travel and torch mechanics seen when evaluating mig welding overhead position push or pull methods: torch angle, gravity, and fluid dynamics dictate whether you push arc forces through or pull slag over your bead.
Prepping for the Hot Pass
Once the root is in, your job is only half done. Downhill 6010 passes leave concave tracks along both toes of the bead, historically referred to on the pipeline as wagon tracks.
Take a 1/8-inch grinding disc and “window” your root pass. Grind the centerline flat and burnish out the wagon tracks along both edges until bright metal shows. Follow up immediately with a knotted wire wheel.
If you leave slag valleys along the edges, your second pass (hot pass) cannot melt them out cleanly, resulting in elongated slag inclusions during radiographic inspection.
Pipeline Welder FAQs
1. What causes suck-back on a downhill root pass?
Suck-back occurs when the arc voltage is too high or the hot pass is applied too aggressively, pulling the molten root metal back toward the outside surface via capillary draw.
2. Can you weave a 6010 root downhill?
No, never use a wide weave downhill; keep the rod steady in the gap with a stringer motion or a micro-stepping push to maintain arc pressure.
3. Why do pipeline welders use 6010 instead of 7018 for roots?
The cellulose coating on 6010 produces a forceful gas jet that penetrates tight gaps downhill, whereas 7018 slag runs ahead of the puddle and causes slag inclusions.
4. What is the ideal travel angle for a downhill root pass?
Hold a 5- to 15-degree upward drag angle so arc pressure prevents the puddle from running down in front of your rod.
Burn Bright or Burn Through: Final Pointers
Mastering the vertical down root pass comes down to trusting your fit-up and leaning into the cut. Do not baby the rod.
Bury the 6010 into the joint, keep that tight 5- to 15-degree drag angle, listen for the muffled jet exhaust echoing inside the pipe, and keep your hands moving smoothly down the wall.
Once you learn to steer that keyhole by sound and feel, your roots will shoot clear on every X-ray bend test that comes your way.